
![]()
1976 Palm Beach
TZE166V100710
During the Spring of 2005 I replaced the fresh water pump in my GMC with a new pump. I selected the FloJet Sensor VSD™ Pump rated at 3.7 gpm. The old pump was working fine but since I was in the process of installing a permanent bed, I figured that it would be a good time to redo the fresh water system. It was relatively easy to install because everything was out in the open and accessible. The new installation eliminated quite a bit of the clutter that I had previously. I did not reinstall the accumulator tank at this time. I'll probably install it at a later date.
FloJet Sensor VSD™
Pump - 3.7 gpm.
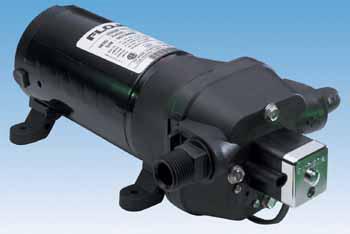
Description from
Camping World's Website:
The performance and reliability you’ve always wished for
in a pump can now be yours. Flojet’s unique Variable Speed Drive system needs no
pressure switch. Its microprocessor provides precise speed control to match the
system demand. As more water is needed, the motor drives the pump for more flow.
As the demand lessens, the motor slows to a super-quiet speed, yet maintains a
steady pressure. The result is an unbelievably home-like flow. This smooth
performance from no flow to maximum flow is sensor controlled, without any
cycling – so an accumulator tank is not needed. The system is free of pulsation,
water hammer and temperature swings. Amp draw reduces as flow reduces to
conserve energy, ranging from less than 1 amp to a max.of 10 amps. Self priming
up to 10’.Automatically adjusts to 12V or 24V input. Thermal overload protection
with auto restart. USA.
There were a couple of things that I noticed right away about the new pump:
|
When restarting the system after winterizing or for from a previously empty water thank, the new pump primes itself much faster than the old pump did. It now takes less then 30 seconds compared to the 5-10 minutes it took before which is a major improvement. | |
|
While billed as being "super-quiet", I notice that it makes a considerable amount of noise when it starts up and then as pressure builds it gets quiet. However it is not as quiet as I had expected. | |
|
If there is no pressure in the lines and I open a faucet there is about a 1 second delay before the pump starts and then a couple seconds more before water starts to flow. The old pump started pumping as soon as I opened a faucet. Apparently the built-in microprocessor has to figure out first that that the pressure is low and then how fast to run the pump. | |
|
The pump is supposed to have a "unbelievably home-like flow". I am not sure that I agree, because at home when I turn on a faucet the water starts flowing right away. | |
|
Even though this pump is billed as not needing an accumulator tank, I think that I will install my old accumulator tank in the hope that it will eliminate the delay on startup and help keep the pump noise down. We will see if that works. | |
|
3.7 gpm is not as much volume as the old pump had but it is adequate for my needs. | |
|
There are a few advantages to having this new technology pump: 1. Faster priming from an empty water tank 2. simplified plumbing by eliminating two check values and a filter (screen) 3. Possibly better water conservation due to the fact the new pump has less flow than the original. |
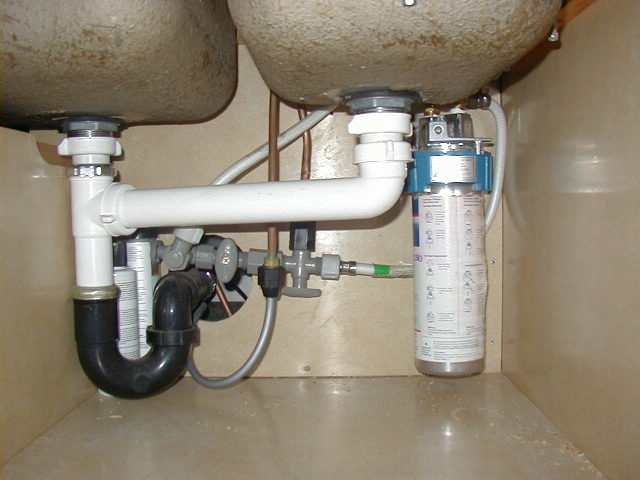
Emery Stora's
Water Filter
I saw this picture of Emery Stora's water filter setup and thought that I would install a filter too. I figured that I would just run out to Home Depot and pick up a filter and install it in about an hour. Well I got the filter OK. It cost $26.97 with a cartridge to remove chlorine for $7.97. After I got the stuff home I decided to take a closer look at what Emery did. I could see that there was more to it then I had at first anticipated. That prompted the following email exchange with Emery on the GMCnet:
>Hi Emery!
>
>I decided this weekend would be a good time to install the water
filter. I
>looked at the picture that you sent me of your installation and I guess I'm
>confused.
>
>Rather then simply putting the filter in the cold water line by you
added a
>valve and some other stuff.
>
>Can you explain what you did and why you did what you did?
>
>Thanks
>Richard
>1976 Palm Beach
>Troy, Michigan
Hi Richard - since I winterize my GMC by filling the lines with RV antifreeze I
didn't want my filter to get full of antifreeze so I used a heater bypass valve
set to bypass the filter. It is also helpful if your filter element gets
clogged while on a trip and you don't have an extra filter with you as you can
just bypass the filter with this setup. I used to just use an old filter
to substitute when I winterized but when I went to a newer single valve water
heater bypass, I had this three valve set left over and decided to mount it by
the filter last year.
Emery
77 Kingsley
Santa Fe, NM
That all made sense to me. Since I live in a cold climate I too winterize my GMC with RV antifreeze. I already have a bypass setup for the water heater and that works great. Now I need to get a water heater bypass kit for the water filter. I wrote to Emery again:
>Emery,
>Makes a lot of sense. I should have known what you did when I looked at the
>plumbing. I think I want to do the same thing.
>
>I wish I had known this earlier today. I dropped my brother off this
>morning at Metro Airport for a return flight to Florida and I think you know
>that there is a Camping World near there. I could have picked up a heater
>bypass kit today.
Richard - Camping World is having a $1 shipping charge special through April. That is less than the cost of the gasoline for you to go there. Call them at 1-800-626-5944
I believe that the only type they have right now is the single valve model that I used on my hot water tank. It is part 15717 $19.99.
I was just in Home Depot today and saw that they sell the identical valves to the ones that were in the bypass kit that I used. You could easily make your own bypass using these plastic valves. Probably a lot less than $19.99.
Emery
About 10 days later (I took my time ordering and I didn't want to go to Home Depot) I got a water heater bypass kit from Camper's Choice. I got it from them because it ended up being less than from Camping World.
One of these days I'll describe the problems I had with this little job. Meanwhile, I'll just say that this little job took me over three weeks and many trips to Home Depot for fittings and a replacement flaring tool. Emery made it look too easy!
On advantage with my system is that I need only turn a single valve to bypass the filter. Emery has to turn three valves I think. But then he recycled his old heater bypass kit and I had to buy a new one.
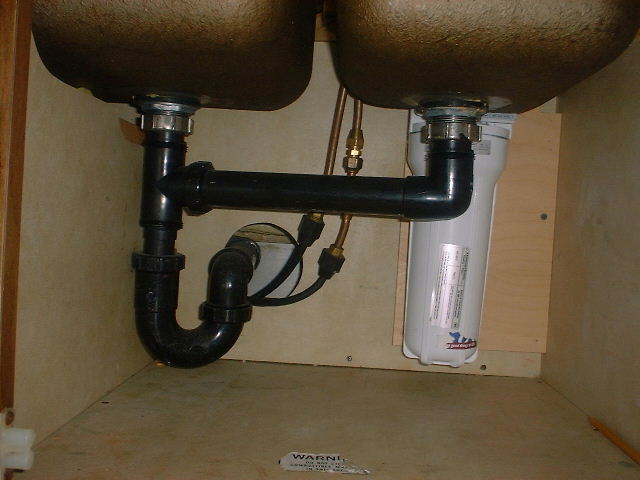
This shows the water lines under the sink as they were before I started. The previous owner must have done some sort of repair on the cold water line. At least I won't have to cut that and try to put a flared fitting under there. I temporally installed the filter to see what kind of clearance I would have.
I had to install the filter on a board because there was no way to install all the fittings (there is a check valve too) with the filter attached to the back of the under sink cabinet.

The sink drain pipe is removed here because I needed better access to the fittings.
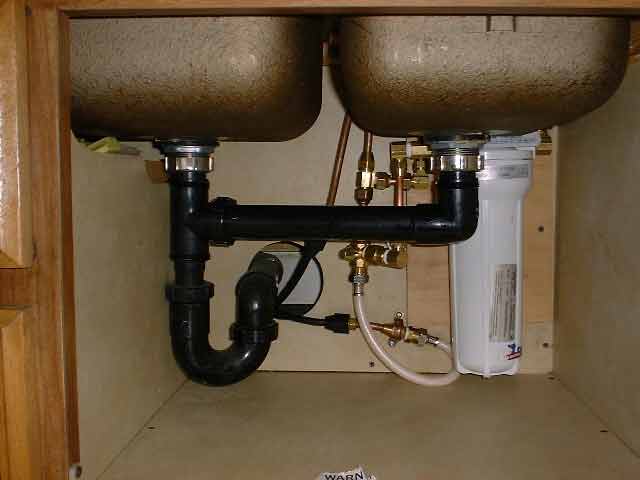
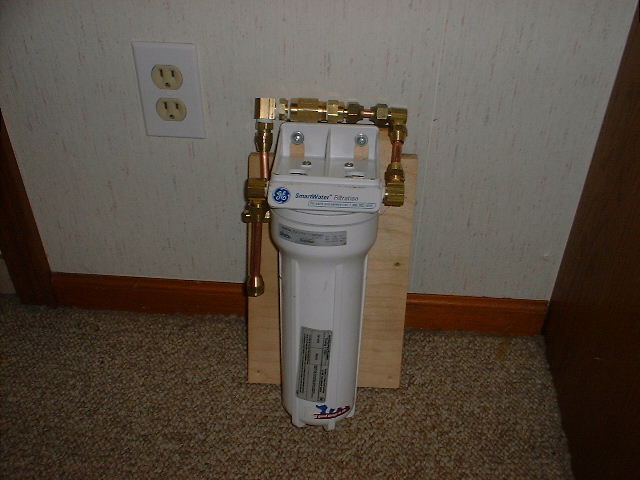
Here's everything installed and working.
*model P124
$29.59 @ Camper's Choice
|
*Camping World offers the model P2290 for $36.99. | |
|
It appears to be slightly bigger (9"x4 1/16" x3 5/8" vs 8.9" x 4" x 3.6") but with the same pressure rating (125psi). | |
|
I found that a fully charged accumulator will yield 28 oz of water (3 1/2 cups) which I think will be adequate for my purposes. | |
|
The spec sheet that came with the unit states that the "gas/liquid volume is 42.8 cubic inches (.7 liters)". |
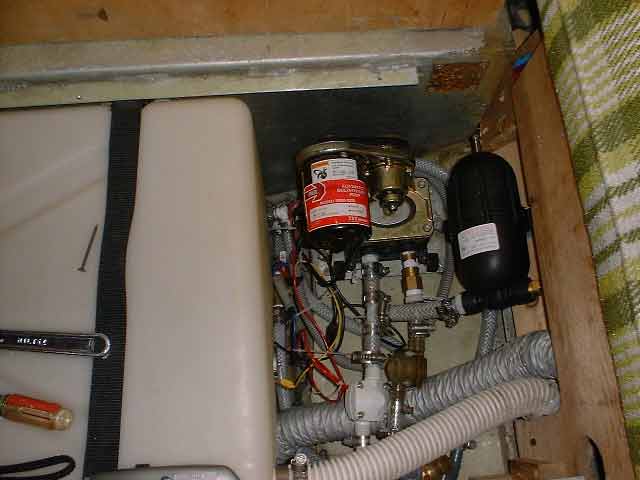

These pictures show the new Shurflo accumulator tank that I installed to control the cycling pulsation that I've grown to hate whenever I take a shower. I also disliked that fact that the water pump runs whenever I want even a small amount of water. Rinsing my toothbrush or a quick toilet flush always causes the pump to run. This is inconvenient at night when someone is sleeping in the back because the pump is located right under the head of the person trying to sleep.
The tank only took me about an hour to install. The biggest problem was finding something to attach it to. I ended up attaching it to a piece of 2x4 that I then attached to the frame of the water pump compartment.
The P124 looks pretty small, and some people have commented that it may be too small to be adequate. I found out that I can flush the toilet and brush my teeth with the small amount of water in the accumulator. That 's all I really wanted in the first place, besides minimizing the annoying pump pulsations.
There are alternatives to a store bought accumulator tank:
At 10:37 PM 5/25/01 -0700, you wrote:
>Just a short time ago Emery mentioned he made a tank with a short piece of
>plastic pipe glued a cap on each ends , drilled and tapped holes on each
>end for fittings. Sounds like a very economical way to go.
>Marlene
Yes, and it did work, however I decided that since it didn't have a diaphragm in it between the air and the water, it would eventually become water logged and have to be drained of water in order to restore the pressure. So, I decided to put a small drain valve in the bottom and a removable plug in the top but when trying to install the drain valve, I cracked the PVC cap and then decided to buy the SureFlow one rather than go to all the work to make another.
Emery
Hidden among the tangle of water hose and wires in the "pump house" is a RV Pump Converter Winterizing Kit ($12.29 at Camper's Choice) that I installed a couple of years ago. This lets me draw RV antifreeze directly from the gallon jug to winterize my water system. I guess the previous owner just poured it into the water tank when he winterized the coach.
When I installed the RV Pump Converter Kit I installed a Water Heater Bypass Kit ($16.99 at Camper's Choice) which allows you to bypass the water heater when you're pumping antifreeze through the water system. Of course you have to drain the water heater, but at least you're not filling it with antifreeze in order to winterize the rest of the system.
I installed a ball valve way, connected to a "T" in the line coming from the water tank. That valve is connected to a water line that goes into the propane compartment. I can attach a hose or just let the water drain out at that point. That setup lets me drain the water tank in less than 5 minutes when I'm winterizing.
I replaced all the water lines with 3/4" OD (1/2" ID) reinforced braided vinyl tubing that I bought at Home Depot. I also replaced all the fittings. The OEM tubing was pretty sorry looking. The tubing's been in about a year and seems to be working out. The stuff is rated for "low pressure", "flood/water uses" and "pneumatic/vacuum." Hopefully that will work in the GMC for the long term. I'm sure that it will be at least as strong as what was there before.
I replaced the water heater's heating element when it burned out with a 1500 watt unit. That sure heats the water up in a hurry. I couldn't find a 1000 watt element which is what you're supposed to use. So far I've not had any problems with the higher wattage unit. That was the first repair I made to the coach after I bought it. Someone had apparently turned the water heater on when it was empty.
I also had to replace the water heater thermostat when it failed a little while later. Fortunately those parts are "off the shelf" items at places like Home Depot and Lowes.
Page was last modified: 11/23/2005 09:51:13 AM